Agricultural Literacy Curriculum Matrix
Lesson Plan
Terrariums: A Look at the Living and Nonliving World
Grade Level
Purpose
Students observe the interactions between living plants and other living and nonliving things in a small terrarium environment and discuss similarities between the terrarium environment and the farm environment. Grades 3-5
Estimated Time
Materials Needed
 Activity 1: Terrariums
- 2, 2-liter bottles for each student or group of students
- Razor blade
- Scissors
- Terrarium Building Checklist
- Moist potting soil
- Small pebbles or aquarium rock
- Water in a spray bottle or crushed ice
- Seeds
- A variety of seeds will work, but agronomic or crop seeds are inexpensive and germinate quickly. Recommended seed varieties include wheat, soybean, popcorn, and bean seeds; these may be available from your local grocery store. Seeds for terrariums are also available for purchase from agclassroomstore.com.
- Paper funnel (can be made by students)
- Terrarium Observation Log
Activity 2: If It Weren't for Farmers
- If It Weren't For Farmers PowerPoint Slides
Elaborate
Vocabulary
organic matter: a soil component derived from the decay of once-living organisms like plants and animals
soil: a mixture of minerals, organic matter, water, and air, which forms on the land surface and can support the growth of plants
terrarium: a transparent enclosure used for keeping and observing small animals and plants indoors
transpiration: the process by which plants release water vapor back into the atmosphere through their stomata
water cycle: the series of conditions through which water naturally passes from water vapor in the air to being deposited (as by rain or snow) on earth’s surface and finally back into the air through evaporation and transpiration
weather: the state of the atmosphere at a given place and time in regards to heat, dryness, sunshine, wind, rain, etc.
Did You Know?
- A farm is an ecosystem because it is made of living and nonliving things that interact and exchange energy.1
- The farm ecosystem is unique because humans control many of the interactions among the things on the farm.1
- Farmers need to understand how things on their farms interact (their farm ecology) in order to make choices about how to raise their crops and animals.1
Background Agricultural Connections
It can be easy to forget how interconnected Earth’s systems are. Humans couldn’t exist on Earth without plants, which provide us with food to eat, oxygen to breath, and materials to make our homes, clothes, and more. Plants in turn depend on energy from the sun both for their own sustenance and to help power the water cycle that brings rain. Plants also need nutrients from the soil. Some nutrients come from the nonliving mineral component of the soil and some come from decomposing organic matter, which is the waste created by living and dying plants and animals. In this lesson, students will become more aware of how living and nonliving things work together by creating and observing a terrarium environment.
You may want to begin by allowing your students to go out to the school yard and make two lists—one of nonliving things they see and the other of living things they see. Living things have a number of different identifying characteristics—they are made of cells, obtain and use energy, grow and develop, reproduce, and respond and adapt to their environment. Grass, trees, and other plants are some of the most obvious living things students might see. However, if they look closely at the ground they might notice insects, or if they look to the sky, they might see birds. Ask students to note everything they see as living and nonliving. Guide them to ask the following questions to figure out if something is living: Does it breathe? Does it eat? Does it respond? Does it reproduce? Does it grow?
A rock may be an obvious nonliving thing, but clouds, bike racks, brick, etc., should also be noted. Your school may have some wood playground equipment—is this wood living or nonliving? The truthful answer would be either nonliving or once living. If the roots and leaves were still attached it would be living. You may need to help students make this distinction. Soil has living creatures in it (the soil may seem alive), but the small particles of sand, silt, and clay are rock particles that are nonliving.
The contents of the terrarium should somewhat mimic Earth’s living and nonliving things. Rocks will be added to the terrarium as an important drainage component; the rocks are not living. (Students might like to bring in one special small rock to place in their terrarium on the soil to observe what it does as the plants grow.) Plants on Earth and in the terrarium are living things. They are not only important as human food and shelter or wildlife habitat but also provide oxygen and play an important role in the water cycle. Plants take up water from the soil through their roots, move the water through stems to their leaves, and then as plants “breathe,” the water evaporates into the air through transpiration.
When students plant seeds in their terrariums, they are somewhat mimicking what farmers do when they plant their fields. Just as the seeds in the terrarium depend on living and nonliving things in their environment, so do the farmers’ crops that provide us with food to eat, clothes to wear, and much more. The success of a farmer’s crop depends on the weather, the health of the soil, and the actions that the farmer takes to prevent weeds from growing, prevent pests from damaging the crop, and provide water and nutrients to the growing plants. We all depend on farmers to provide us with food, and farmers must work with the living and nonliving components of Earth’s systems in order to harvest a bountiful crop.
Engage
- Review with students the difference between living and nonliving things.
- Tell students that you’re going to go for a walk to observe living and nonliving things. Ask them to bring a notebook and something to write with. Pause in a couple of locations on your walk to give them time to observe and write down two lists—one of nonliving things they see and the other of living things they see.
- Ask students to share some of the living and nonliving things on their lists. Are any of the things on their lists connected? Do they interact with each other?
- Tell students that in the following activity, they are going to explore the connection between living and nonliving things by building their own miniature ecosystem.
Explore and Explain
Activity 1: Terrariums
Teacher Preparation
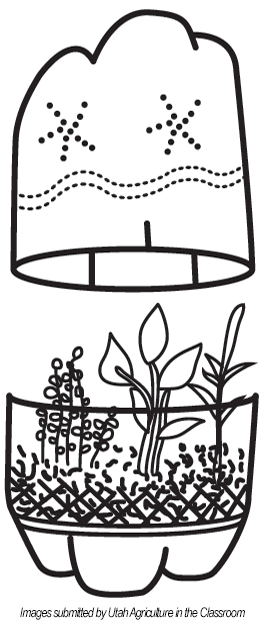
 For efficiency and safety; cut the 2-liter bottles prior to the activity. Decide if you will have each student create their own terrarium (they will prefer this) or make the terrarium as a group.
- Remove the label from each bottle.
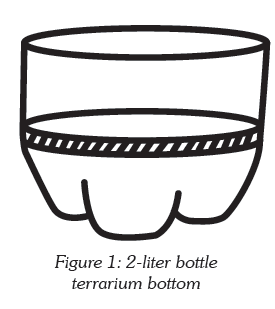
- Cut the bottle base as noted in Figure 1. Use a razor blade to make the initial incision and then you will be able to use a pair of scissors. Cut 3 inches (7–8 cm) up from the bottom.
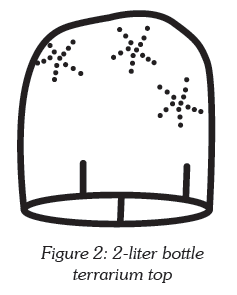
- Cut the second 2-liter bottle 5 inches (13 cm) up from the bottom of the bottle to be the terrarium top.
- Poke air holes in the top as shown in Figure 2. Begin with three to four x-shaped patterns of holes, or use a nail to add holes (more holes can be added later if the terrarium appears too wet).
- Cut three or four 1-inch (3 cm) slits in the open end of the top so it slides into the base.
Student Procedures
- Provide each student or group with a bottle base and top. Also make available the supplies needed to fill the terrarium: aquarium rocks, moist potting soil, seeds (about 20 seeds per terrarium, more if the seeds are small like wheat and fewer if the seeds are large like beans), and water (spray bottle or crushed ice).
- Display or hand out the Terrarium Building Checklist, and instruct students to:
- Add ¾ inch (2 cm) of aquarium rocks to the base.
- Optional: Make a paper funnel to help add the soil layer without making a mess.
- Add 1½ inches (4 cm) of moist potting soil on top of the rocks.
- Place some of the seeds around the perimeter of the bottle (so they can watch the germination and view roots) and place a few in the middle of the bottle.
- Cover the seeds with another ¼ inch (1 cm) of potting soil.
- Water the soil/seeds with a spray bottle, OR place one inch of crushed ice on top of the soil to simulate winter. It is now winter in the seasonal terrarium. Lead a brainstorming discussion about the changes that occur as winter gives way to spring. As the ice melts, the seeds are watered and the water cycle will become visible to your students. They can also note the changes of the seasons from winter to spring in this “seasonal” terrarium. Within a few weeks, the warmth and moisture will encourage seedlings to creep cautiously upward. Eventually spring will come to the terrarium with tall, viable plants.
- Place the top on the terrarium carefully. (Teacher Note: You may want to do this yourself so that the terrarium contents don’t get spilled in the process.)
 Place the terrariums in a sunny location if possible.
- Review some interactions between living and nonliving things that students might observe in their terrariums using questions such as:
- Are plants living or nonliving things? (living)
- What do living plants need to grow and be healthy? (water, sunlight, air, nutrients, and temperatures that are not too hot and not too cold)
- Are these things living or nonliving? (nonliving)
- Do plants affect any of these nonliving things? (plants participate in the water cycle by taking up water from the soil and releasing it into the air, tall plants with big leaves can block sunlight and shade smaller plants, plants take nutrients from the soil to grow, and when plants die and decompose they add nutrients back to the soil)
- Provide each student with a Terrarium Observation Log activity sheet. Explain to the students that they will be checking their terrariums regularly (it will likely take three to five days for the seeds to begin to germinate) and recording any changes on their data sheet. Ask students to look for the following things:
- What are the seeds doing?
- On which parts of the terrarium do you see water?
- Is there anything new happening in your terrarium today?
- After observing for a week or more, take the tops off of the terrariums (you may want to do this for students so that the terrarium contents don’t get spilled), and ask your students to feel the soil. Discuss the following:
- Why is the soil still wet?
- Do you think that any water has evaporated from the soil? Why?
- If water evaporated, where did the evaporated water go?
- Did it ever rain in your terrarium? How do you know?
- Where did the rain come from?
- Is there anything in your terrarium that reminds you of a cloud or
- cloud drops?
- What conditions in the terrarium help the seed to grow?
- How is water circulated in the terrariums?
- Where did the water (that you initially added to the soil) go? Explain.
- Relate what you see in the terrariums to what happens to water on Earth.
Activity 2: If It Weren’t for Farmers
- Ask your students if they can think of any ways that a terrarium might be like a farm.
- Share the PowerPoint slides If It Weren't For Farmers with students. As you go through the slides, ask students to make a list of any living or nonliving things they see that are also in their terrariums.
- Discuss the items that students listed from the PowerPoint. Explain to students that sunlight, soil, water, and weather are important to the plants that farmers grow just as they are important to the plants that the students grew in their terrariums.
Elaborate
-
Use the Make Your Own Worm Bin instructions to create a classroom vermicomposting bin out of a recycled styrofoam cooler. Prepare the cooler ahead of time, and then have students add the bedding, worms, and vegetable scraps. Vermicomposting in your classroom is an effective way to engage students with a wide variety of science concepts. For more information about using the worm bin to investigate ecosystems, life and nutrient cycles, and decomposition, see the lesson Vermicomposting (Grades 3-5).
Evaluate
After conducting these activities, review and summarize the following key concepts:
- Organisms like plants and animals depend on living and nonliving things in their environment.
- The interaction of sun, soil, water, and weather impacts agricultural production.
Recommended Companion Resources
- Backyard Detective: Critters Up Close
- Bottle Biology
- Diary of a Worm
- Dirt: The Scoop on Soil
- Grow it Again
- Jump Into Science: Dirt
- Make Your Own Worm Bin
- Mountains of Jokes About Rocks, Minerals, and Soil
- Rocks and Soil
- School Garden Center
- Seed Ball Garden Activity
- Seeds for Terrariums
- Soil! Get the Inside Scoop
- The Garden Show (Musical Play)
- The Great Big Water Cycle Adventure
- The Ultimate Guide to Gardening: Grow Your Own Indoor, Vegetable, Fairy, and Other Great Gardens
- You're Aboard Spaceship Earth
Author
Organization
 |
We welcome your feedback! If you have a question about this lesson or would like to report a broken link, please send us an email at matrixelearning@gmail.com. If you have used this lesson and are willing to share your experience, we will provide you with a coupon code for 10% off your next purchase at AgClassroomStore. |