Agricultural Literacy Curriculum Matrix
Lesson Plan
Vermicomposting (Grades K-2)
Grade Level
Purpose
Students create a worm bin which will serve as a basis for investigations about ecosystems, life and nutrient cycles, and decomposition. Grades K-2
Estimated Time
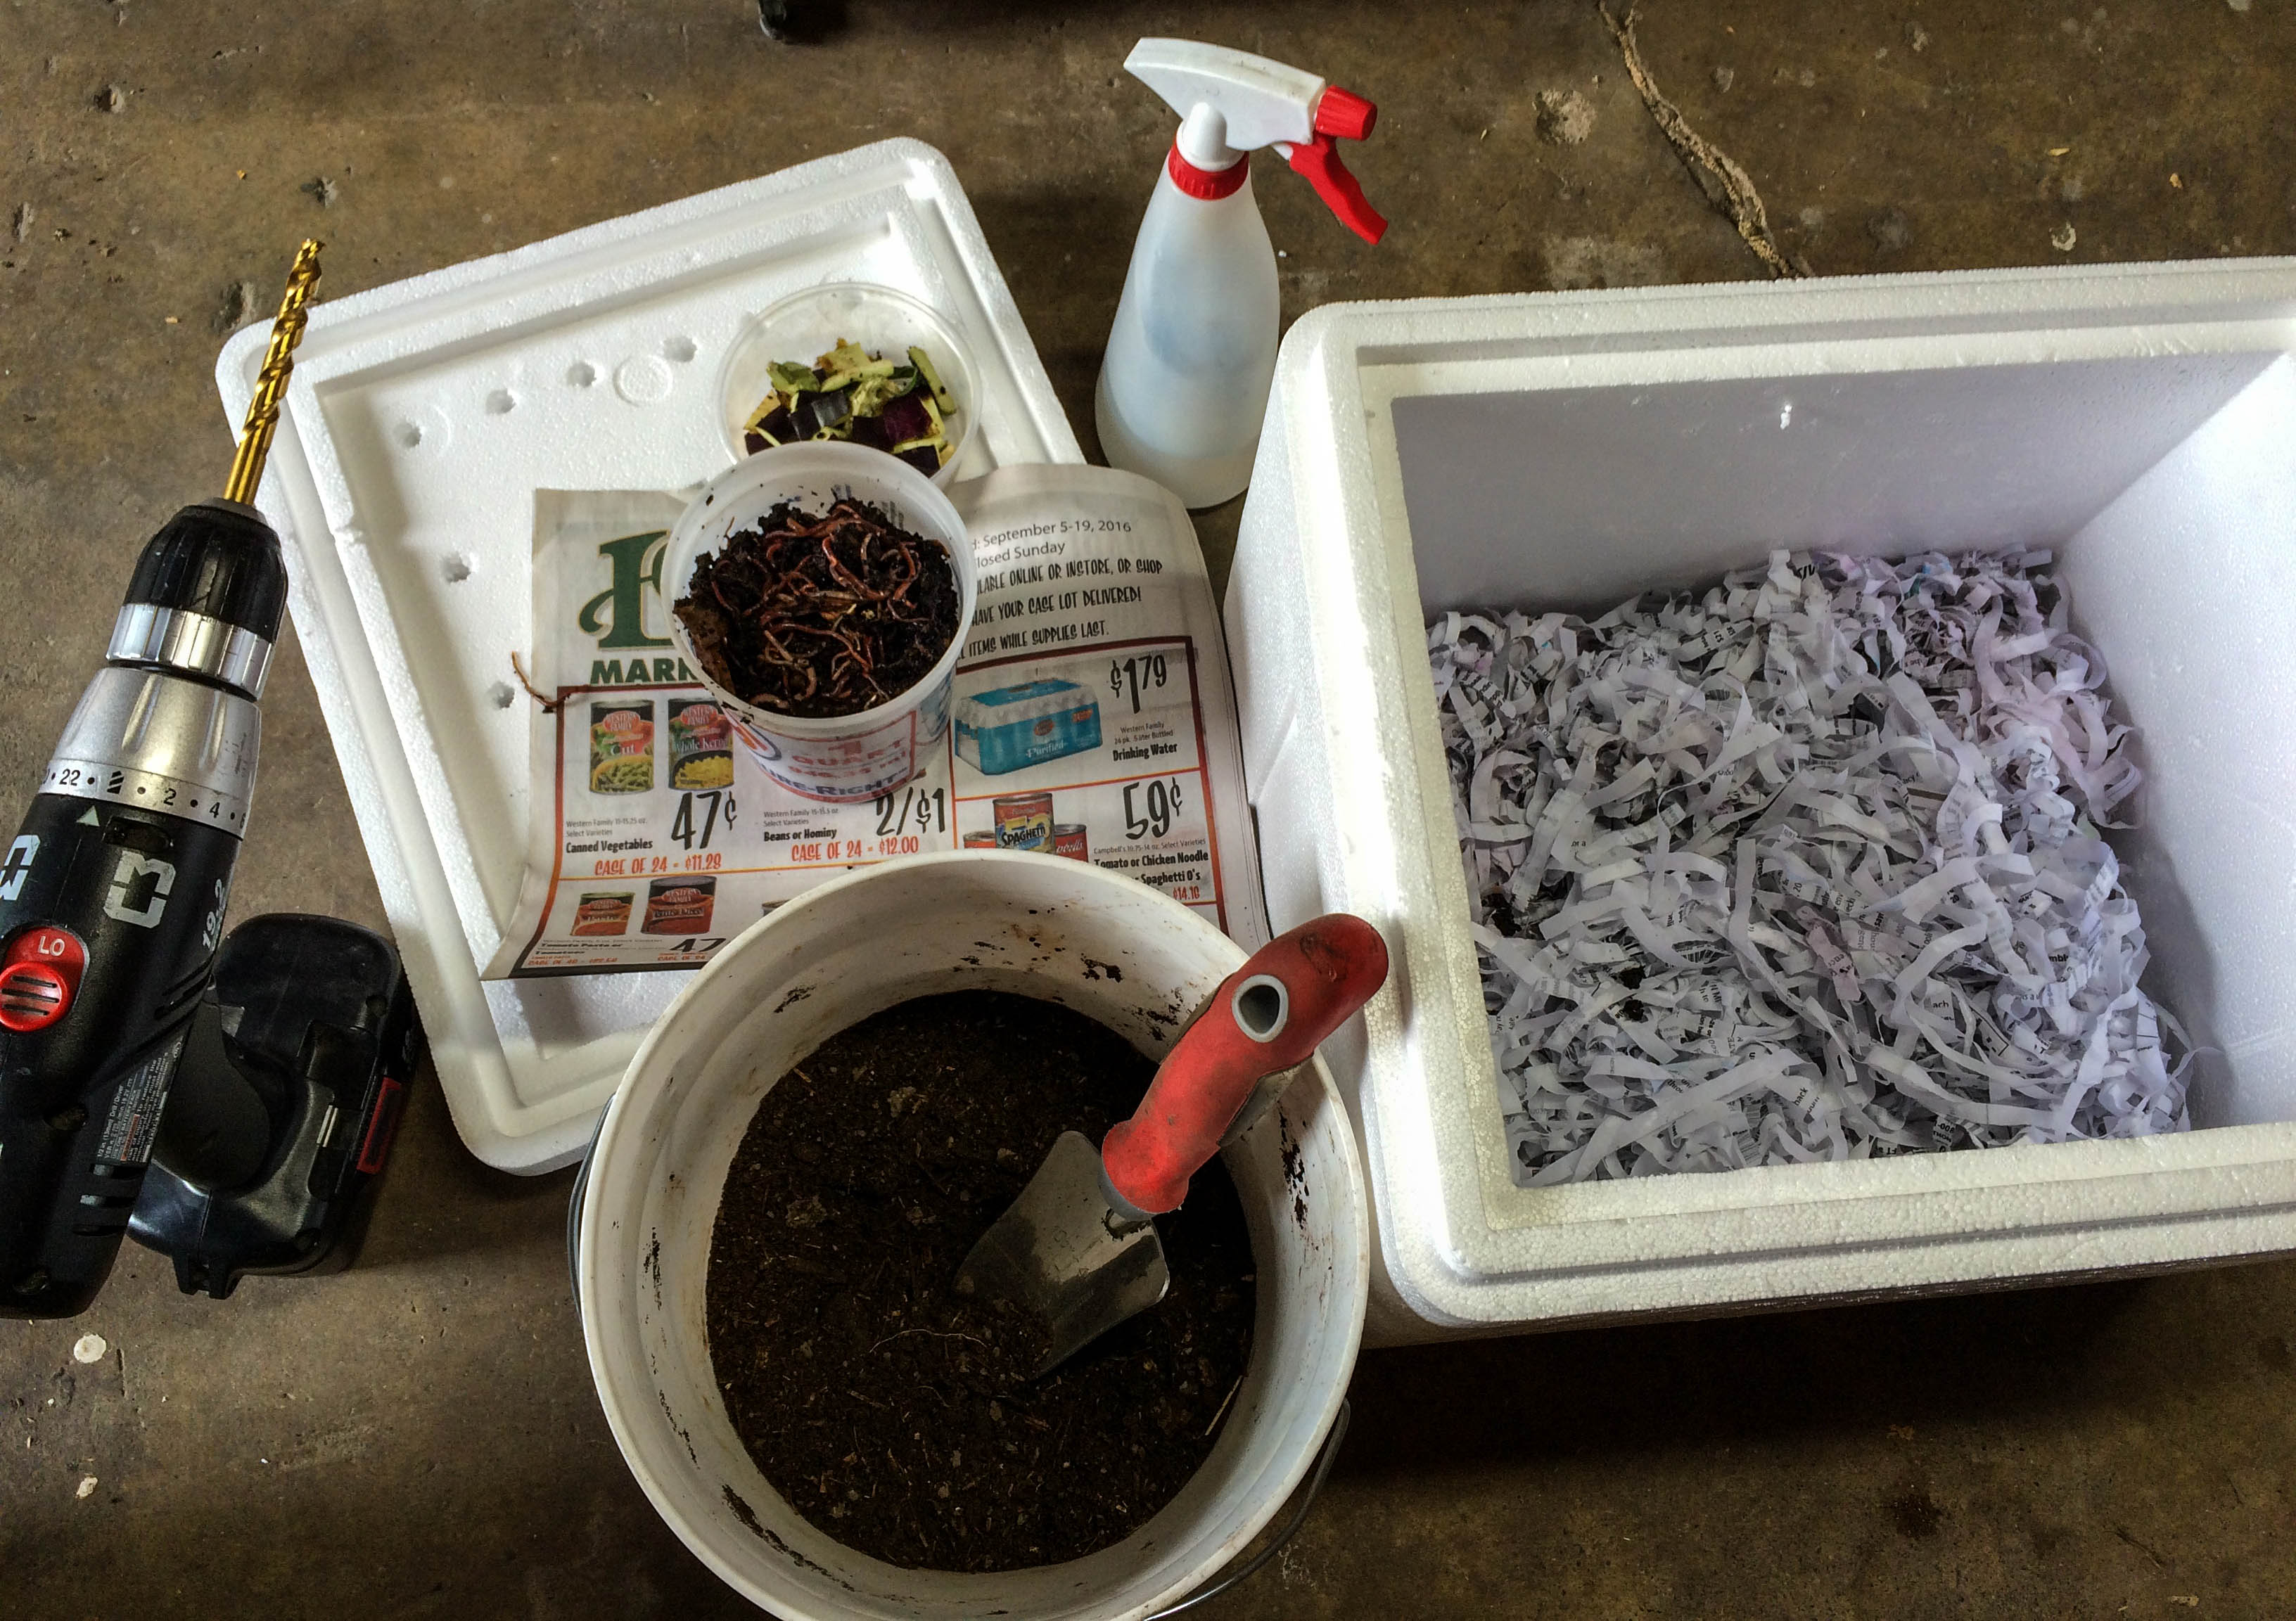
Materials Needed
Engage:
- Red wiggler worms (These worms have a number of different common names; look for the scientific name Eisenia fetida. Search online or contact your county Extension agent for sources of red wiggler worms.)
Activity 1: Setting Up a Vermicomposting Bin
- Recycled styrofoam cooler (Styrofoam coolers are used to ship medicine that needs to stay cold. Many doctors, dentists, and veterinarians receive several coolers each month. The coolers are often thrown away after the shipment is received. Consider asking a local medical office to save one for your classroom.)
- Drill with a large bit
- Shredded paper
- 2-3 full pages of paper
- Soil
- Spray bottle filled with water
- Vegetable scraps
- Red wiggler worms
Activity 2: Worm Investigations
- 2 jars
- 2 jar lids with holes
- Dark soil
- Light sandy soil
- Vegetable scraps
- Dark paper, 2 pieces
- Tape
- Red wiggler worms
- Tray
- Newspaper
- Measuring tape
- Flashlight
- Chenille stem
- Items to act as barriers (pencils, clothespin, block of wood, crumbled paper, pile of soil, etc.)
- Paper towels
- Wax paper
- Seeds
Vocabulary
aerate: to supply soil with air
castings: the waste produced by worms
ecosystem: a biological community of living organisms interacting with the nonliving parts of their environment
nutrient: a substance that provides nourishment essential for growth and the maintenance of life
organic matter: a soil component derived from the decay of once-living organisms like plants and animals
recycling: to make something new from something that has been used before
vermicomposting: to use worms to convert organic waste into compost
Did You Know?
- There are approximately 2,700 different kinds of earthworms.1
- The largest earthworm ever found was in South Africa and measured 22 feet from its nose to the tip of its tail.1
- Charles Darwin spent 39 years studying earthworms more than 100 years ago.1
Background Agricultural Connections
Students may be familiar with recycling tin cans and plastic bottles so that the materials can be used again and again, but do they realize that recycling happens in natural systems as well? By bringing vermicomposting into your classroom, students can observe how ordinary creatures like worms become super recyclers, turning kitchen scraps into compost that can help living plants grow and thrive.
Worms live in soil all over the world. They help change bits of dead plants and animals back into nutrients that plants can use. Students may be interested to learn that worms recycle by eating dead organic matter and then turning it into castings—also known as worm poop—that are nutrient rich and useful to plants. Worms also help aerate and loosen the soil so that plants’ roots can more easily develop underground. For these reasons, worms are an integral part of a healthy ecosystem.
Although a farm may not be the first thing you think of when you hear the word ecosystem, farms are natural systems with living and nonliving components that affect each other. Healthy soil is the foundation of a productive farm. Pretty much everything we eat comes from the soil. Fruits, vegetables, and grains come from plants that grow in the soil, and dairy and meat products come from animals that eat plants that grow in the soil. So, worms are not only important for composting food scraps, they can also play a role in making healthy soils to grow food for us to eat.
Vermicomposting is a great way for students to observe the effect worms have in a miniature ecosystem. There are many different types of worms, but red wigglers (readily available online) are best suited for indoor vermicomposting. To begin, set up a worm bin according to the included instructions or in the way that will best suit your classroom needs. There are many different ways to build a successful worm bin. For alternative instructions, see the Classroom Vermicomposting Resources at the end of the Procedures section of this lesson.
Once the bin is set up, assign one or two students a week to give food scraps to the worms. Worm bins do poorly with food scraps that are fatty or contain meats, but work well with newspaper, vegetables, coffee grounds and even eggshells. Although worms eat a lot for their size, they need only a couple small handfuls of food a week. As the worm population grows, they should be able to eat more food. Make sure the food scraps are buried—this will prevent bad food odors. Keep a spray bottle available so that students can add water when feeding the worms if the bin seems too dry.
Maintaining a worm bin is easy, but be sure to keep the following things in mind as you tend to the worms:
- Too much moisture will cause molds and other unwanted pests to grow, which will prevent the worms from doing their job. If condensation is forming inside the bin, simply remove the lid to let the bin air out for a couple of hours and then add more holes for drainage and ventilation.
- The worms will have a hard time surviving if the compost is too dry. The bedding material should be moist to the touch without forming droplets when squeezed. If there is not enough moisture, simply use a spray bottle to add one or two tablespoons of water at a time until the bin is at the right moisture level. If lack of moisture continues to be a problem, consider closing off some ventilation holes with tape.
- If the worms are given too much food, the bin may start to stink as bacteria and other microorganisms break down the food before the worms can. If this becomes a problem, it may be a good idea to remove some of the excess food and monitor how fast the worms are eating the food that is added.
- Typically, room temperature is great for worms, but be cautious that they do not get too hot or too cold, as either situation could stun and possibly kill the worms.
After a few months, the compost can be harvested. Open the bin, and shine a bright light onto the soil. The worms will migrate to a deeper level away from the light, and the top layer of compost can be scraped away for later use. Continue this process until you get close to the bottom of the bin and mostly worms remain. Then add fresh bedding and soil to the bin to give the worms a new home again. The compost that is scraped away makes a wonderful soil amendment for garden and indoor plants.
Engage
- Ask the students what the word recycling means. Make a list of items they have recycled before.
- Ask the students if food can be recycled. Tell them to imagine they are in the cafeteria at their school. Have them try to think of ways they can use the leftover food being thrown away to make something else. (This question will probably bring interesting responses.)
- Ask the students what happens to leaves in the forest during the winter. (They fall to the ground.) Ask them why the leaves that fall from the trees every year don’t just pile up higher and higher. (They break down/decompose and become part of the soil.) Explain that food can be recycled in the same way plants are recycled in the environment. Tell them that they will recycle their leftovers into a special soil that will help give plants the nutrients they need. The secret is worms.
- Tell the students that they are going to build a worm bin to serve as a home for worms that will be kept in the classroom to observe and study.
- Show them the worms that will be added to the bin, and allow them to find a worm and look at it closely. Tell the group that these red wiggler worms are especially suited for composting food scraps inside an indoor bin.
Explore and Explain
Activity 1: Setting up a Vermicomposting Bin
- Prior to class, drill ventilation holes in the
 cooler lid. Have a vacuum cleaner handy—this can be messy!
 - Ask the students what kind of environment they think worms need to be comfortable and healthy. (They will probably say worms need soil to live in.) Explain that the worms you have are a special kind that don’t burrow deep into the soil. Red wiggler worms prefer to live near the surface of the soil where they have lots of organic matter to eat. They need protection from the sunlight but don’t like to be deep in heavy soil. Explain to the students that they will be making them a home out of newspaper strips.
- Have the students rip newspaper into inch-wide strips to use as bedding for the worms.
- As the students are ripping the newspaper, discuss the importance of moisture, air, and temperature in the worm bin.
- Fill the cooler about half full with shredded paper. Wet the shredded paper until it is uniformly damp but not dripping. It should feel like a well wrung-out towel. Explain to the students that worms breathe through their moist skin. If they dry out, they can’t breathe. However, if the bin gets too wet there may not be enough oxygen for the worms.
- Mix the soil with the shredded paper. A couple of scoops with a trowel is plenty. The soil should be moist, but not muddy. Explain to the students that worms don’t have teeth. The hard mineral particles in the soil will help break down food in the worm’s gut. Soil also contains microorganisms that will help jump-start the composting process.
- Add the red wiggler worms on top, and watch as they burrow down to get away from the light.
- Add vegetable scraps as food for the worms. Begin with one cup or less. It will take the worms some time to acclimate to their new home and develop an appetite. Feed the worms as needed. Worms can survive on paper alone but will readily devour many other foods. Discuss with the students the kinds of foods that worms like to eat. They like newspaper, but the glossy pages aren’t good for them. They like most food scraps, especially from fruits, vegetables, and grains. They also like coffee grounds and filters, tea bags, fallen leaves, eggshells, weeds, and lawn clippings. It is best not to feed them meat, dairy, or foods that contain a lot of fat. Avoid overfeeding to prevent odors. As the population begins to grow, the worms will eat more.
- Place full pages of paper on top of the soil and spritz with water until the paper is damp. Place the lid on top, and store the bin where it won't get too hot or too cold. Check the moisture level regularly. The top sheets of paper will help keep the bin contents moist; when they get dry, spritz the upper layer of the bin with water. The worms need moisture to live, but the bin may begin to stink if it gets too wet. If this happens, simply add shredded paper to absorb excess moisture.
- Discuss the important things that worms do to keep the soil healthy:
- Worms burrow in the soil. The burrows and trails that they leave help the soil absorb and hold water. This is important for plants that need water to grow. The burrows and trails also make it easy for plant roots to grow into the soil. When the soil is full of worm burrows and plant roots, it is less likely to wash away or erode when it rains.
- Worms eat organic matter like dead leaves. The castings that come out the back end of a worm after it has digested its food are full of nutrients and microorganisms that are good for plants and for the soil. Worms eat dead plants and other waste and turn them into food for living plants. Worms act as nature’s recyclers and make the soil fertile.
- Discuss the importance of soil as a natural resource that is necessary for the production of our food. Almost everything that we eat, much of what we wear, and many of the tools that we use originate from plants grown in soil on a farm. See the lesson plan The Soil Chain for hands-on activities to teach about the importance of soil.
Activity 2: Worm Investigations
The worms and castings from your worm bin can be used to engage students in a wide variety of investigations. A few possibilities are described below. While worms are out of the bin, keep a spray bottle handy to prevent the worms from drying out.
- Observe the effect worms have on soil.
- Gather the following materials: two jars, lids with holes, dark soil, light sandy soil, water, vegetable scraps, two pieces of dark paper, and tape.
- In the bottom of each jar, put a layer of dark soil about one inch thick. On top of this, place a one-inch thick layer of light sandy soil. Keep adding dark, then light layers until the jar is half-full.
- Slightly moisten the soil in both jars with water.
- Place two worms in one jar, and then add some vegetable scraps to the top of both jars.
- Put a lid on each jar. Label the jar with the worms as “Worms” and label the other jar “No Worms.”
- Take the dark pieces of paper and wrap around each jar. Tape tightly. Put the jars aside.
- Have each student write down their predictions about what they think will happen in each jar.
- After three days unwrap the jars. What do you observe?
- Observe the characteristics of living worms.
- Divide the students into cooperative groups.
- Place a few worms on a tray covered with a damp newspaper for each group.
- Allow the students to observe their worms moving around on the tray.
- Have the students sketch a worm, measure how long it is, record how it moves and any kind of noise made as it moves.
- Have the students discuss which end is the head and which is the tail. Have them give observable evidence to justify their reasoning.
- Encourage the students to gently pick up a worm and describe what it feels like on their hands.
- After allowing the students to make their initial observations, gather the trays, and return the worms to the bin or continue with more of the following investigations.
- Investigate worms’ responses to light and touch stimulus.
- Have the students predict the worms’ responses to light from a flashlight and to being gently touched with a chenille stem. Have them justify their predictions.
- Put the worms on trays and give one to each group.
- Shine a flashlight directly on the worms and observe their behaviors.
- Gently touch the worms with a chenille stem that has a small loop at that end and observe their behaviors.
- Allow 5-10 minutes for the students to observe the worms’ behaviors. Have students record their observations with an explanation for the worms’ behaviors.
- Investigate worms’ responses to barrier stimulus.
- Give each group several items to act as barriers (a pencil, a clothespin, a block of wood, a crumbled piece of paper or a pile of soil, etc.).
- Have the students predict the worms’ responses to these barriers. Will they initially go around a barrier? Crawl over it? Burrow underneath it? Try to keep going forward? Go backwards? Will their responses differ for different barriers? Have students justify their predictions.
- Give each group a tray and have the students arrange three or four barriers on it.
- Place several worms on the tray.
- Allow 5-10 minutes for students to observe the worms’ behaviors. Have the students record their observations with an explanation for the worms’ behaviors.
- Investigate worms’ responses to temperature stimulus.
- The day before this activity, place several slightly damp paper towels in a freezer. Place layers of waxed paper in between the damp paper towels for easy separation.
- Prior to this activity, slightly moisten several paper towels and leave them at room temperature.
- Just before this activity, place several slightly damp paper towels in a microwave to heat them.
- Have the students predict how the worms will react to a cold surface, a room-temperature surface, and a hot surface and then justify their predictions.
- Give each group a tray and a cold, a hot, and a room-temperature paper towel.
- Place several worms on each paper towel.
- Allow 5-10 minutes for students to observe the worms’ behaviors. Have students record their observations with an explanation for the worms’ behaviors.
- Investigate the effect of the vermicompost on plant growth.
- Depending on the resources available, try growing seeds with differing amounts of vermicompost added or adding different amounts of compost to plants growing in the garden.
- Have the students predict which amounts of compost will produce the best results.
- Observe changes in the plants for two to four weeks and have the students use tape measures to record growth.
Classroom Vermicomposting Resources
There are many different ways to build a successful worm bin. These resources provide a variety of ideas for bin construction as well as additional classroom activities and information about harvesting finished vermicompost.
Elaborate
-
Share the book Nature Close-up – Earthworms by Elaine Pascoe with your students, and use the experiments provided at the end to investigate how worms react to different colors of light, what worms like to eat, and how worms affect plant growth.
-
View the Worms at Work video to see a 20-day time lapse of the inside of a vermicomposting bin.
Evaluate
After conducting these activities, review and summarize the following key concepts:
- Worms are living things that respond to stimulus and have basic needs.
- Worms eat organic matter and produce nutrient-rich castings, converting food scraps and dead plants into nutrients that help living plants grow.
- Worms aerate and loosen the soil, improving the ability of the soil to hold water and making it easier for plants to grow.
- Soil is an important natural resource that helps produce food, clothing, and materials for many of the things we use every day.
Recommended Companion Resources
- Backyard Composting
- Compost Stew
- Composting: Nature's Recyclers
- Construct a Compost Bottle
- Diary of a Worm
- Dirt: The Scoop on Soil
- EIEIO: How Old MacDonald Got His Farm
- Epic Pumpkin Collapse Timelapse
- Farmer Eva's Green Garden Life
- Farmer Will Allen and the Growing Table
- Leaf Litter Critters
- Make Your Own Worm Bin
- Mountains of Jokes About Rocks, Minerals, and Soil
- Rocks and Soil
- Rotten Pumpkin: A Rotten Tale in 15 Voices
- The Garden Show (Musical Play)
- The Magic School Bus Meets the Rot Squad: A Book About Decomposition
- Up in the Garden and Down in the Dirt
- We Dig Worms!
- Wiggling Worms at Work
- Worm Farm
- Worms Eat My Garbage
Author
Organization
 |
We welcome your feedback! If you have a question about this lesson or would like to report a broken link, please send us an email at matrixelearning@gmail.com. If you have used this lesson and are willing to share your experience, we will provide you with a coupon code for 10% off your next purchase at AgClassroomStore. |